Showing posts with label Art Room. Show all posts

Friday, January 6, 2023

Reorganizing my Embrodiery Flosses and Supplies

 I know this will be a big job but it needs to be done. 

First I printed out an Anchor to DMC floss conversion chart whitch I found here at

 Yarn Tree .  

I also created an Excel sheet so i could keep track of all of the dmc colors I have on hand so I dont keep buying repete colors which i seem to do alot :).


As you see my current way of storing my threads and excessories is done in a mixture of diffrent ways that I have discovered over the years trying to  organize them.

 Bobbins

Clothes Pins

Leaving them in there orginal wrapping 

By project

But in the end I just ended up  tossing them all in a bin together creating this beautiful jumbled mess.


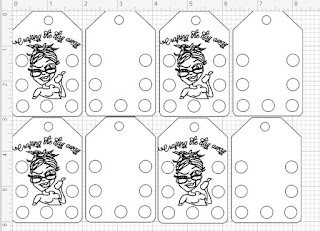
To get started I went into my Cricut Design space and desiging my own CraftyLady Floss Drops. 

This way I will be able see all the colors that I have on hand and get inspired to use them.

Being thrown in that container kept them out of sight out of mind,


I used my cricut to draw out my logo and cut out  the tages I needed. 
I then glued the 2 halves of cardstock together to make them thicker.
Once dry I sealed them with packing tape and used hole punch to repunch all of  the holes out. 
They now had a protective covering and feel like a thin piece of plastic making them more durable.


Made a bunch of drop cards so I am now ready to start moving all of my embroidery threads
 to there new homes.


Now that the flosses are all hung up I organize the rest of the items in the container.

I took small size snack bags and placed card stock in so that they could stand up taking less room in the container and easier to grab when something is needed rather than digging threw container. 
These will holds extra flosses and hang tags.

Other items being stored here are sewing needles , small scissors, a tape measure, sewing kit , hoops and a notebook which I like to have in each of my  different crafting bins to write down insperations for that craft as well as projects thatI am working on. This way if i walk away from a project I will  know what and why I was making the project and any important information needed in order to complete it.


So nice and neat now what a difference a day makes :)


Since it was so neat and orderly on the inside i decided to make all new matching lables for all of my Crafting storage containers.
So now side tracked for a minute as this is now an important step to my organizing project, so off
 the dollar store to pick up 2 rolls of vinyl a teal and a purple to create my new lables . Thinking this will be a simple task on my cricut maker 3. Time to get busy and knock these out so i can move on to the next organizing task.




Friday, January 28, 2022

Jewelry Making / Beading Station DIY


Materials Needed

1 Piece of foamboard

1 square of felt

Stick pins

Glue

Wire dish rack from dollar tree

Small storage boxes dollar tree

Materials for decorating ( I used washi tape and ribbon from dollar tree)


Cut foam board into the following pieces

     12 X 11  inches

 12 X ½ inches  (2 of these)

 12.5 X 3 inches  (2 of these) Sides

12 X 3 inches  (2 of these) Top & Bottom


Glue the square of felt onto the bottom portion of the 12 X 11 piece of foamboard


Use the 12 X ½  inch piece of foamboard as a guide with the 12 X 3  pieces of foamboard, to place top and bottom sides of the station.

Use stick pins to attach the two pieces of foamboard together.


Once in place separate enough to add glue  and then seal back in place.


To attach the sides  run glue along all the edges then place the 12.5 X 3 pieces of foamboard aligning them so that they are even  with the top and bottom pieces already in place.

There will be some over hang on one end so that you get a good fit 

once  everything is in place trim this off. 


Place the  12 X ½ inch piece at the top edge of the felt glue in place and add stick pins in sides and along top to secure into place. These will stick out of the bottom . You will use wire cutters to snip them off when finished.


Use the other 12 X ½ piece to cut into 2 inch sections to make the dividers. Glue in place and again use stick pins to secure in place on the sides 


Underneath run glue along all the edges to reinforce and seal any cracks

You can also do this in the small sections on the front .


Decorate to your preference I used what I had  Washi tape and ribbon.

Since washi tape likes to lift up I glued it down to the top edges to give it a nice finished look.


For the sides I pinned the ribbon into place  at each of the corners and glued them down into place as I went around. Using clamps to hold as it dried. Let dry over night.


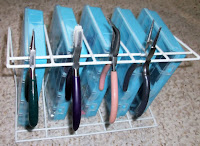
I picked up this wire dish rack from the dollar tree as well as these 5 small plastic containers.

Place rack on its side great way to have your tools handy and use containers for 

the projects your working on or to store your favorite beads or findings.


Put it all together and your done and it wouldn’t be complete without my magnifying light.


Enjoy your Jewelry Making /Beading Station!!!


Tuesday, February 16, 2021

Sometimes you just have to make something

 Woke up around 4am and just had to make something. 

mmmmmmmmmmm What to make?

I could use some new sketch books yeah that's it  going to make this and then go back to sleep.

Grabbed a piece of foamboard  / a roll of painters tape / a bottle of glue / my Tissue papers in / some embroidery floss / a needle / my cutting board / a pin tool / and a stack of paper to fill my book with.

Then I got busy measuring ,cutting gluing, and sewing and in a couple of hours I had these 2 great new books.


This is how they turned out I'm really likening them.


This one was a very easy book that was just held together with some good sturdy string. 


This one was a little bit more time consuming as I kettle stitched all of the signatures together. 
By doing this the book will lay flat no matter what page I'm drawing on.


Have any of you had that late night crafting bug bite? and if so 
What have you created during these late night crafting sessions?


Happy Crafting!!!!


Tuesday, December 1, 2020

Art room flashback

 This was my art room 8 years ago when I had lots of space to create  but since we have downsized to an apartment all this is now in a closet so funny as this room is close to being the size of  the apartment we now live in lol.


3/24/12 art room
We moved into a new place back in march and to my pleasant surprise there was a large L shaped finished room in the basement. It was dirty and trashed but I see a great art room here.

Here are some B4 photos of the room with all my crafting supplies piled up in the middle of it lol
Top right looking into the room from main door
Top left  looking into room from back storage area
Bottom  shots of the left side of the room
 

Let the painting begin :)
Top photos added an off white border to top right wall and painted the entrance wall off white.
Bottom photos painted under boarder and back wall light blue.
Top photos painted left wall light blue . Placed painters tape in the pattern I wanted.
Bottom photos Painted center section off white. Painted the side sections in chocolate brown.
Top photos Removed the painters tape. Painted Chocolate circles on back wall
Bottom photos Added off white circles to back wall.
The people the moved out left these 2 things in the back storage area they were broken and covered in cob webs so I cleaned them off, put them back together and painted them chocolate brown. Now they are my new storage units :)
I still have tons supplies to unpack but I am in the process of creating the different work stations and getting it all set up to my liking. I still need to set up a sections for  drawing /painting/ fiber textile arts/and crafting machines but I have some other main sections placed.
Top photos Looking into the room on the back wall is my clay and candle making stations. In the center of the back is a main crafting table. on  the right wall is my main crafting storage section. Lots of places to keep things. Love it Love it Love it :) I will also be adding the phrase " Creativity Makes Visible what might not have been seen" to the off white border on the right side wall.
Bottom photos on the left side of the room which is my jewelry making section Going to create an inspiration board to go on the off white wall. I will also be creating a photo box section to take pictures of finished projects by the main entrance.

Well This is my new art room for now hopping to have it all in order by the end of May.
So i can just kick back Listen to music and create all day :)