Friday, January 6, 2023

Reorganizing my Embrodiery Flosses and Supplies

 I know this will be a big job but it needs to be done. 

First I printed out an Anchor to DMC floss conversion chart whitch I found here at

 Yarn Tree .  

I also created an Excel sheet so i could keep track of all of the dmc colors I have on hand so I dont keep buying repete colors which i seem to do alot :).


As you see my current way of storing my threads and excessories is done in a mixture of diffrent ways that I have discovered over the years trying to  organize them.

 Bobbins

Clothes Pins

Leaving them in there orginal wrapping 

By project

But in the end I just ended up  tossing them all in a bin together creating this beautiful jumbled mess.


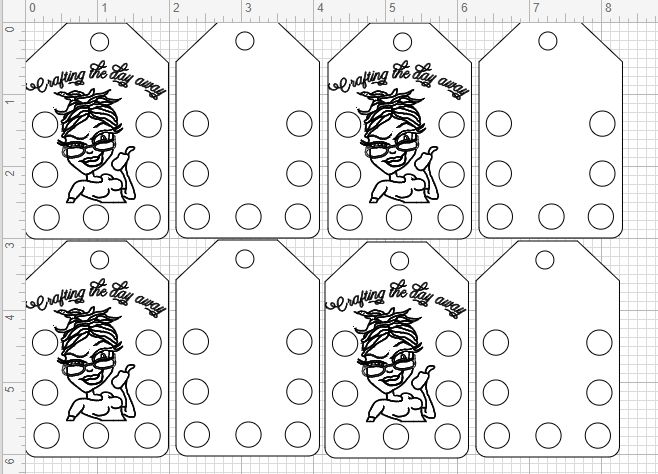
To get started I went into my Cricut Design space and desiging my own CraftyLady Floss Drops. 

This way I will be able see all the colors that I have on hand and get inspired to use them.

Being thrown in that container kept them out of sight out of mind,


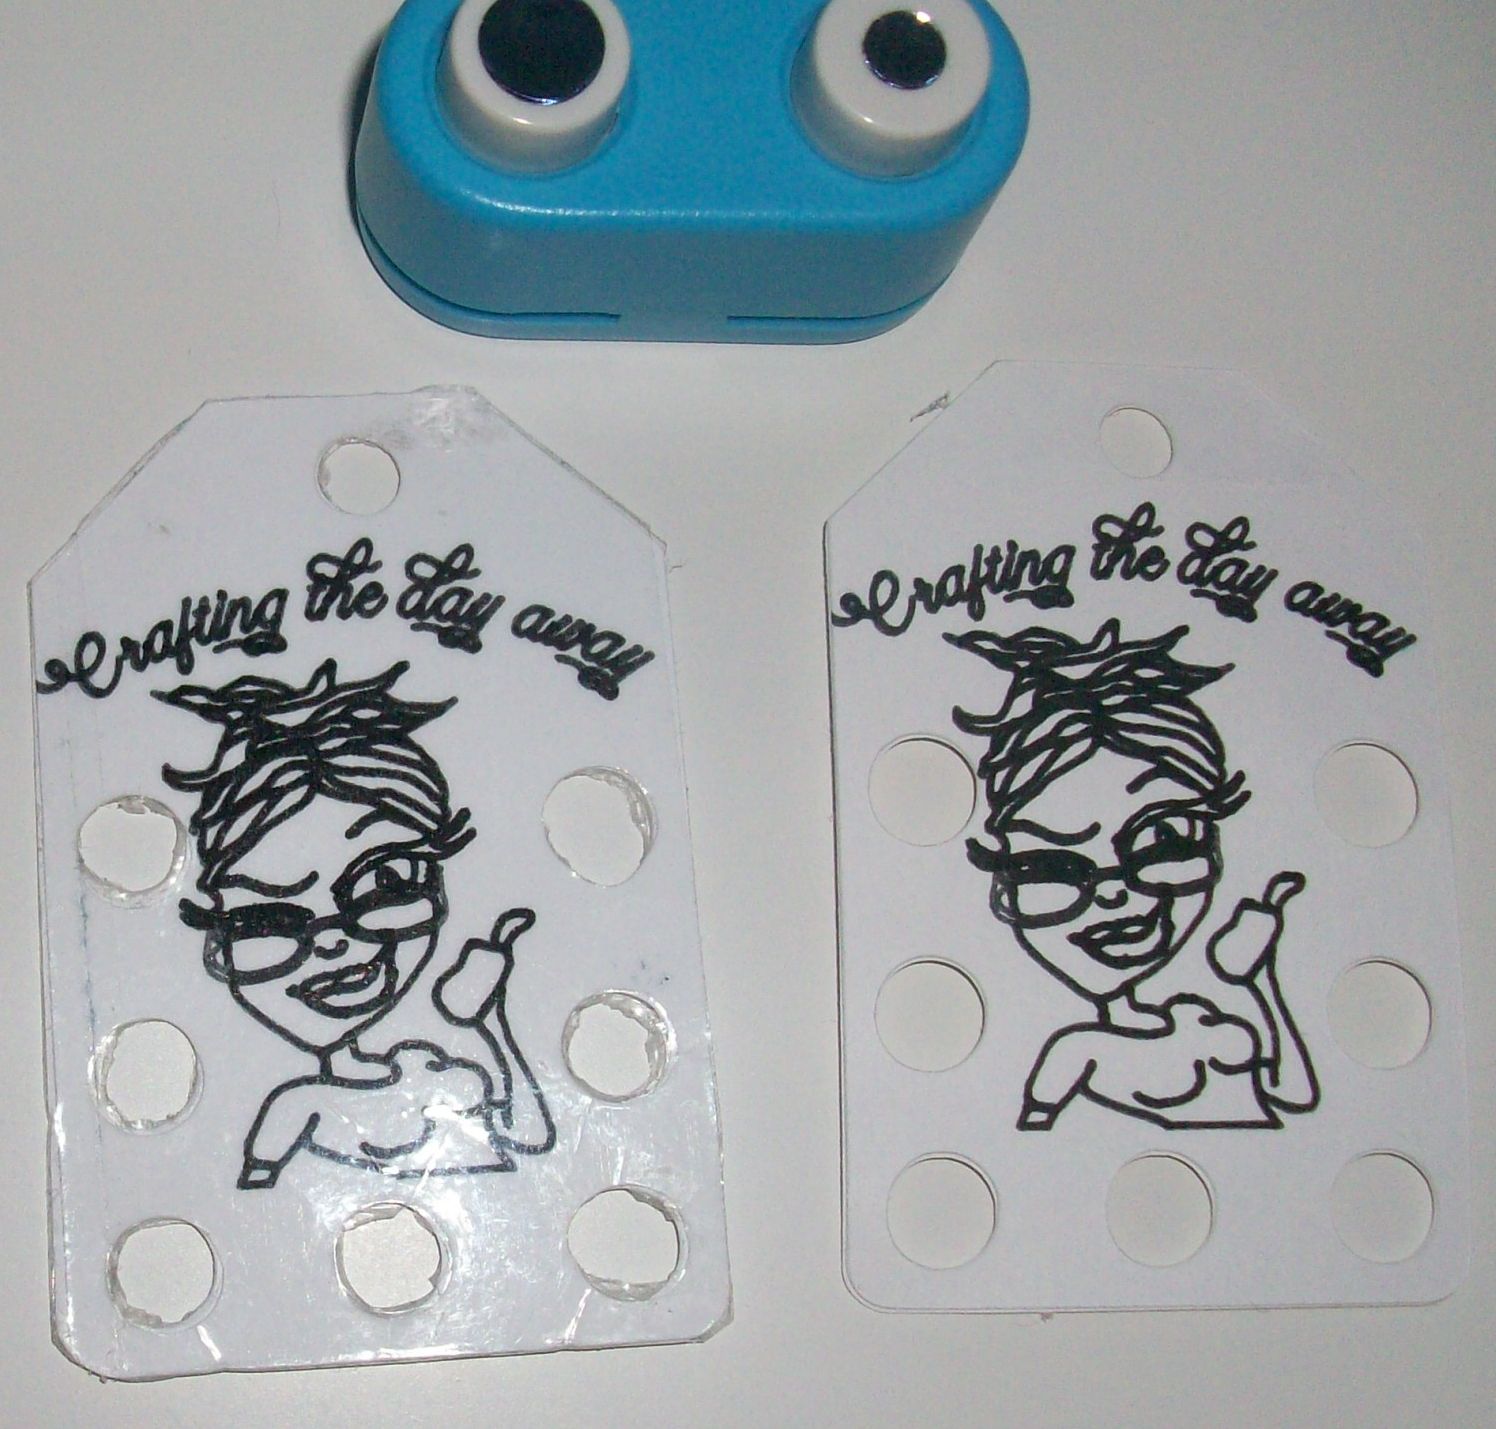
I used my cricut to draw out my logo and cut out  the tages I needed. 
I then glued the 2 halves of cardstock together to make them thicker.
Once dry I sealed them with packing tape and used hole punch to repunch all of  the holes out. 
They now had a protective covering and feel like a thin piece of plastic making them more durable.


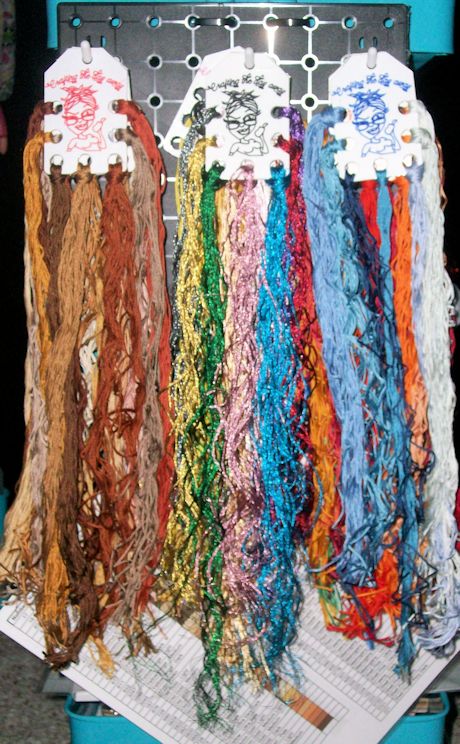
Made a bunch of drop cards so I am now ready to start moving all of my embroidery threads
 to there new homes.


Now that the flosses are all hung up I organize the rest of the items in the container.

I took small size snack bags and placed card stock in so that they could stand up taking less room in the container and easier to grab when something is needed rather than digging threw container. 
These will holds extra flosses and hang tags.

Other items being stored here are sewing needles , small scissors, a tape measure, sewing kit , hoops and a notebook which I like to have in each of my  different crafting bins to write down insperations for that craft as well as projects thatI am working on. This way if i walk away from a project I will  know what and why I was making the project and any important information needed in order to complete it.


So nice and neat now what a difference a day makes :)


Since it was so neat and orderly on the inside i decided to make all new matching lables for all of my Crafting storage containers.
So now side tracked for a minute as this is now an important step to my organizing project, so off
 the dollar store to pick up 2 rolls of vinyl a teal and a purple to create my new lables . Thinking this will be a simple task on my cricut maker 3. Time to get busy and knock these out so i can move on to the next organizing task.


Tuesday, March 29, 2022

Bead Soup Project 4


These Boho earrings will go with all your casual outfits 

and help you practice your wire wrapping skills.

For this earring project it will be a true bead soup creation by just randomly

 picking beads as you create.


Start out with  2 pieces of 20 gauge wire that are 4 inches long, 

a pile of your bead soup beads.

And piece of 26 gauge wire about a foot long.


Wrap  the 20 gauge wire around something to get a nice teardrop shape

Make 2 try to make them the same.


Make wrapped loop on one end of each wire.


Attach thinner 26 gauge wire around top where you created the loop.


Add a bead wrap wire2 times then add another bead.

Do this till you get around the loop leaving an inch on the end bare.


Use the remaining wire to wrap around the hoop end of the wire and bring it straight down the center.


Clip off excess wire leaving enough to make a small loop.


To make the dangle  

string on 4 beads tie 

add 1 bead in between the 4 you first strung on . 

it will look something like this when done.


Add 3 beads onto each of the 4 beads sticking out


Use a piece of the thinner wire to create a link connecting it to the bead shape you just created.


Add this to the loop in the center of you earring and you are done.

Have fun playing with different shapes and sizes


Monday, March 7, 2022

Bead Soup Project 3


This wire and bead bracelet is quick and easy to make.

We start out making these simple rings of 5 beads. String on 5 beads

run thread through then a few time to strengthen and tie together.


Now using 28 gauge wire create links making a loop on one end of the wire

add a bead then add  one of the rings you have just created followed by one more bead.

Finish by making a loop at the other end.

Your links should look like this when complete.

Make as many as you think you will need for your bracelet. This will be around 1 per inch.


Now that you have all of these links that you will need

 It is time to connect them together with the next link you will be making.


For seed beads I needed 4 inches of 28 gauge wire for each of these links.

Place wire threw one of the loops of a link you had made earlier.

Place 3 beads on each side.


Cross wire threw a single bead


Add 3 beads on each side of wire again 

but this time cross the wire threw the end of another link.


Runs this wire back down through the beads and once again pass through the center bead.

Clip off excess wire and your next link is complete.

Repeat this process till your chain is as long as you need it to be.


Making the Clasp

To make a simple S hook, take a piece of 20 gage wire and wrap it around something round the size you want your hook to be. So that it looks like this.


Clip ends and round them to look like this

Hammer to harden is needed.


Decorate to match chain and connect to end.


And you’re done.


Hope these basic techniques help to get your creative juices flowing

And get you started with your own creations.

And of course a reason to use up that Bead Soup !


Tuesday, February 22, 2022

Bead Soup Project 2

 Simple Heart Stud Earrings


These quaint little cute hearts are so easy to make you will want a pair in every color  

along with matching bracelets and necklaces .


To make these hearts start out stringing 4 beads like this and tying them together to form this shape.


The 2 side beads and the bottom of the bead form the center of your heart.

The top bead is the color that will be surrounding your heart.


You will now add the outer edges of the heart.

Add enough beads so that there will be enough room for 1 more bead on each side like shown here.

Go threw all beads just added and the bead they are attached to  few time to secure.


Do same on other side


On the bottom add 4 but  you will be adding  

one at the bottom in the middle of them in the next step.


To finish it off go thru all of the outer beads adding another bead in the empty spaces to fill them in and remember when you get to the bottom to add 1 bead between them.

Do some shaping to get a good heart shape and your done just make 1 more and glue them onto a post.


Turn into a bracelet/necklace simply buy connecting the hearts with the chain pattern in the

Bead soup project 1