Showing posts with label Beads. Show all posts

Tuesday, February 22, 2022

Bead Soup Project 2

 Simple Heart Stud Earrings


These quaint little cute hearts are so easy to make you will want a pair in every color  

along with matching bracelets and necklaces .


To make these hearts start out stringing 4 beads like this and tying them together to form this shape.


The 2 side beads and the bottom of the bead form the center of your heart.

The top bead is the color that will be surrounding your heart.


You will now add the outer edges of the heart.

Add enough beads so that there will be enough room for 1 more bead on each side like shown here.

Go threw all beads just added and the bead they are attached to  few time to secure.


Do same on other side


On the bottom add 4 but  you will be adding  

one at the bottom in the middle of them in the next step.


To finish it off go thru all of the outer beads adding another bead in the empty spaces to fill them in and remember when you get to the bottom to add 1 bead between them.

Do some shaping to get a good heart shape and your done just make 1 more and glue them onto a post.


Turn into a bracelet/necklace simply buy connecting the hearts with the chain pattern in the

Bead soup project 1


Saturday, February 5, 2022

Bead Soup Project 1

 Started this challenge out by separating some of the beads in the soup to see 

what I would be working with. 


Was sort of a slow process but when I liked what I had  I got busy
I had plenty of one color to make one of my favorite easy bracelets so that is project one .
 Lets get to beading

I picked the clasp I wanted to use and added one end in between  4 seed beads.
Then tie this  into a loop running threw it 3-5 time's to reinforce.


Add 6 beads the go through  the two in the center of you clasp connection.
You can go threw this look 2-3 times to strengthen.
Just make sure you end at the two center beads on the end.


Continue making your chain till it is your desired length.
Then add your other clasp to this end.
Again  run through these beads many times to reinforce
Make sure you are done you are coming out of the two center beads of you chain,
As you will be working a pattern back through. Your bracelet.


I used two different. Colored seed beads for my pattern but it can be what ever type of beads you want to use as long as they fit in the empty space in the pattern.


The pattern is  as follows go up threw the connecting two seed beads.
Add your pattern beads to your thread.
Lay these beads across the top at an angle.
And repete these two steps till you get to the end of your bracelet.


This barely  put a dent into  my soup but its a start. 😜


Have fun play with the colors or make it all one color.


.


.


Tuesday, February 1, 2022

Bead Soup Challenge


If your anything like me you have a few containers  full of beads from all of your projects where it was just easier to to dump the excess beads all in one container. then to take the time to put them all back where they belong.  I call this my bead soup and I am always telling myself  that I am going to do something with these beads one day. Well it time . During the month of February. I am challenging myself to get  to this task and try to use some of this bead soup up . I will share tutorials for the  things I create and I hope to inspire you to do this challenge with me and share all your awesome creation's  with me as well. 

Happy Crafting


Friday, January 28, 2022

Jewelry Making / Beading Station DIY


Materials Needed

1 Piece of foamboard

1 square of felt

Stick pins

Glue

Wire dish rack from dollar tree

Small storage boxes dollar tree

Materials for decorating ( I used washi tape and ribbon from dollar tree)


Cut foam board into the following pieces

     12 X 11  inches

 12 X ½ inches  (2 of these)

 12.5 X 3 inches  (2 of these) Sides

12 X 3 inches  (2 of these) Top & Bottom


Glue the square of felt onto the bottom portion of the 12 X 11 piece of foamboard


Use the 12 X ½  inch piece of foamboard as a guide with the 12 X 3  pieces of foamboard, to place top and bottom sides of the station.

Use stick pins to attach the two pieces of foamboard together.


Once in place separate enough to add glue  and then seal back in place.


To attach the sides  run glue along all the edges then place the 12.5 X 3 pieces of foamboard aligning them so that they are even  with the top and bottom pieces already in place.

There will be some over hang on one end so that you get a good fit 

once  everything is in place trim this off. 


Place the  12 X ½ inch piece at the top edge of the felt glue in place and add stick pins in sides and along top to secure into place. These will stick out of the bottom . You will use wire cutters to snip them off when finished.


Use the other 12 X ½ piece to cut into 2 inch sections to make the dividers. Glue in place and again use stick pins to secure in place on the sides 


Underneath run glue along all the edges to reinforce and seal any cracks

You can also do this in the small sections on the front .


Decorate to your preference I used what I had  Washi tape and ribbon.

Since washi tape likes to lift up I glued it down to the top edges to give it a nice finished look.


For the sides I pinned the ribbon into place  at each of the corners and glued them down into place as I went around. Using clamps to hold as it dried. Let dry over night.


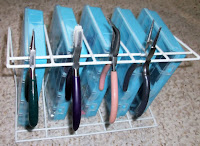
I picked up this wire dish rack from the dollar tree as well as these 5 small plastic containers.

Place rack on its side great way to have your tools handy and use containers for 

the projects your working on or to store your favorite beads or findings.


Put it all together and your done and it wouldn’t be complete without my magnifying light.


Enjoy your Jewelry Making /Beading Station!!!


Friday, April 15, 2016

Paper Tube Beads Decorating Area

There are many ways to decorate your Paper Tube beads before rolling them . But first I will go thru some points you should know about where and what parts of your paper strips  need to be decorated .

IBDCraftyLady Paper Tube Beads
Here is my paper bead display showing samples of all the paper tube beads I like to use. As you can see there are many different sizes and I think about this when designing my paper tube beads. It also helps me when designing a set of paper tube beads that I want to work together. Deciding on how they will be colored to work with each other, and what sizes I will need to complete the set of paper beads.


IBDCraftyLady Paper Tube Beads
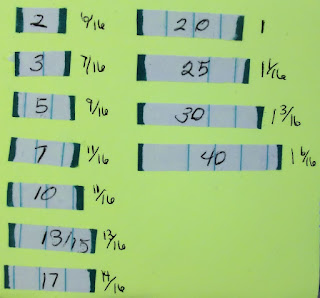
When you are decorating your paper tube beads you must primarily decorate a certain area on the top of your paper strips with the main design you want on your paper bead. These measurements come in very handy when designing your paper tube beads so that your finished paper tube beads all come out looking the same. The width of your paper tube bead does not have an effect when designing. Just the length of your paper strip does, as it must fit all the way around your finished paper tube bead.


Paper length                       Design area
2 inches                                               6/16  of an inch
3inches                                                7/16 of an inch
5 inches                                               9/16 of an inch
7 inches                                               11/16 of a inch
10 inches                                             11/16 of an inch
13 inches                                             13/16 of an inch
15 inches                                             13/16 of an inch
17 inches                                             14/16 of an inch
20 inches                                             1 inch
25 inches                                             1 1/16 of an inch
30 inches                                             1 3/16 of an inch
40 inches                                             1 6/16 of an inch

IBDCraftyLady Paper  Bead Tip


IBDCraftyLady

Monday, April 11, 2016

Paper Beads (Tube Beads)

Paper tube beads one of my favorite paper beads to create as there are so many ways to decorate them.  You can never go wrong with  paper tube beads especially when you want to make a collection of beads that will all work together in a jewelry piece. Creating  and using the same colors and patterns on a lot of different sized paper tube beads.

IBDCraftyLady Paper Tube Beads

What you will need
Paper bead roller - If you do not have one here is a DIY to make your own.
Bead hole maker - If you do not have one here is a DIY to make your own.
White glue
Paper
Scissors or paper cutter
Decorating Supplies - These will vary depending on how you choose to decorate your paper beads. 


IBDCraftyLady Paper Tube Beads tools

To start making your paper tube beads you will need to cut long rectangular pieces of paper.
See the chart below for the different paper measurements that you will need to cut in order to get the size of paper tube bead that you want to make. This chart represents the sizes the beads will be  if they have been made with the paper from spiral notebooks. If a thinner type of paper is used your paper beads will be smaller in width, and if you use a thicker or heavier paper your paper beads will have a larger width.

IBDCraftyLady Paper Tube Beads Chart

Once you have all of the paper strips cut, you will now have to decide how you are going to decorate these paper beads as some types of decorating needs to be done before you roll your paper beads.


IBDCraftyLady Paper  Beads Tip 1

IBDCraftyLady Paper Tube BeadsIBDCraftyLady Paper Tube Beads

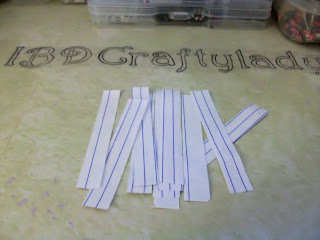
To prepare the inside bottoms of your papers before you roll them. You will want to paint or color the bottom 1/2 inch of the paper so that when the bead is rolled it does not show the white paper in the hole of your bead.This will give it a nice added finish to your paper beads.

IBDCraftyLady Paper Tube Beads

This picture shows you the difference in the appearance of your paper beads if you do not color that bottom 1/2 inch of each paper strip before rolling your paper beads.

IBDCraftyLady Paper Tube Beads


For the purpose of showing you all of the steps to actually form the Paper Tube Beads I will be making  silver paper bead blanks.  So let's get started!

IBDCraftyLady Paper Tube Beads
 Cut your strips of paper to the size you want to make these are 1/2 inch by 3 inches.

IBDCraftyLady Paper Tube Beads
Prepare the bottoms of all your paper strips. If your paper is white and you are making white paper bead blanks you can skip this step.

IBDCraftyLady Paper Tube Beads
Place your paper strip into your bead roller with the colored end facing you.

IBDCraftyLady Paper Tube Beads
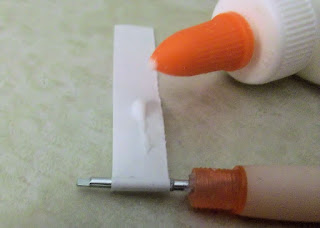
Once you have rolled the colored part of your paper add a light coating of glue all over the remaining part of the paper. I prefer to glue all of the paper instead of just the ends this makes the bead stronger and you do not end up having it unravel on you .

IBDCraftyLady Paper Tube Beads
Keep the paper strip aligned as you roll it to make a nice even bead.

IBDCraftyLady Paper Tube Beads
Then you have finished making the paper bead,  hold the bead in place on the roller and give it a little twist in the opposite direction that you had rolled it this will loosen up the piece of the paper that was place in the bead roller making it release off the roller easier.

IBDCraftyLady Paper Tube Beads
Use your bead hole maker, place the bead you just made onto the bead hole maker and roll it across your finger. this will make a clean hole with no extra paper blocking it.

IBDCraftyLady Paper Tube Beads
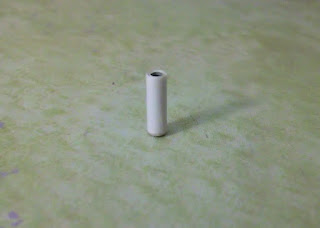
To make sure both ends are flat stand your paper bead upright an press it down on a flat surface.

IBDCraftyLady Paper Tube Beads
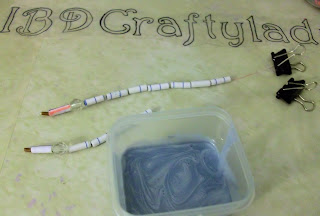
String up your paper beads on to a piece of fishing line.  

IBDCraftyLady Paper Tube Beads
On the end of each piece of fishing line place a few beads these beads will give the glaze a place to settel and it will not ruin your last paper bead that would otherwise be there.

IBDCraftyLady Paper Tube BeadsIBDCraftyLady Paper Tube Beads
Place some glaze into a small container and add some paint to make the glaze the color that you want it. I am using a metallic silver, mix well. I got these great little square containers at the dollar store in a pack of 12. they are the perfect size for me.


IBDCraftyLady Paper Tube Beads
Dip your string of paper beads into the glaze let soak 20+ seconds giving the glaze time to soak in. 

IBDCraftyLady Paper Tube Beads
Let some of the extra glaze drip off this will leave you with less of a mess on your glazing rack.


IBDCraftyLady Paper Tube Beads
Hang your string of paper tube beads to dry.


IBDCraftyLady Paper Tube BeadsIBDCraftyLady Paper Tube Beads

After 4 dips into the silver glaze they are done.

Use your bead hole maker one more time to clear out any excess glaze from the holes.They are now ready to use just like this or you can decorate them further.

During the next few weeks I will be showing you different ways of how to decorate your paper tube beads.

IBDCraftyLady