Wednesday, March 30, 2016

Paper choices when making paper beads

When deciding on what papers to use for making your paper beads consider the following  factors. If you use a paper that is very delicate it is more likely to tear while you are rolling the paper bead. If the paper is a heavier thicker paper it may be harder to roll leaving you with a paper bead that is not wound tightly  or uneven when finished. You will also want to consider the finish if there is one on the paper. You want to make sure that any paper you use will bond  to its self  with the glue that you will be using . You also want to make sure that the glaze and paints that you will be using will not just run off of the finished paper bead once they are applied.

The following types of paper all work well when making paper beads. Try one or try them all find what Types of paper works best for you.

Junk Mail : This would be all of the unwanted items filling your mail boxes as well as old mail that is no longer needed. Much better to make paper beads out of these items that just throwing them away.

Magazines :  This is a great way to recycle all of the magazines piling up around the house. Paper beads made from magazine pages can end up giving you great color combinations that you might not have thought up on your own. You can also separate them  by colors giving you a lot to choose from when working on a project.

Printer Paper : This is any easy way to make paper beads that will all be the same color as this paper comes in a variety of colors. Using printer paper also makes it easy for people that like to use templates  as they can be printed right onto the paper.

Note book paper :  A great way to recycle all of those note books all filled with scribbles and notes that are no longer needed. This lined paper is the perfect weight to make  all types of paper beads and they can be decorated any way you so choose.

Handmade Paper :  You can either make your own Paper Making DIY
, or you can head a local art store where they are more than likely to have a large assortment of art papers to choose from.  These papers will add a lot of texture to your beads that you will not get from any other types of papers.

Brown Paper Bags:  Brown paper bags can give you a heavier bead that when colored and stained can end up looking like wooden beads, and more earthy types of beads.

Wrapping Papers : Using wrapping papers gives you a lot of choices in color and pattern for your paper beads.  This is a very good paper to choose but one downfall of using these is that the chance of the colors bleeding are higher so make sure to make a few test paper beads first to make sure that the glaze you are using to cover them will not ruin them.

Construction Paper :  A thicker heavier paper giving you a more bulkier bead it also has a chance to bleed and color your fingers while making paper beads with it.


Specialty Papers :  These are the finer types of papers  such as rice papers and Japanese chiyogami papers.  


Monday, March 28, 2016

Glazing Rack DIY

IBDCraftylady Paper Bead Project
This glazing rack is 9 inches tall

After all of my testing of different types of  glazing and or drying racks over the years, I sat down and decided what  was needed most and what would help me to be more efficient while making my paper beads. This is the rack I finally came up with and best fill all of my paper bead making needs.


What you will need to Make a 14 inch tall glazing rack

IBDCraftylady Glazing Rack

1 pieces of foam-board  or 2 pieces of foam board 1 black and 1 white if you want it two toned like the ones I have made here. I just used scraps of what I had and sized it to my needs.

A pack of stick pins

A bottle of glue

5 chop sticks /  5 thin dowels, or 5 long skewers
I used the packs of chop sticks that come when we order Chinese food as no one but me knows how to use them, so I had a lot of extra ones in my home. You could also use  thin dowels cut into  8-9 inch lengths or even the bamboo skewers used for cooking. 


IBDCraftylady Glazing Rack

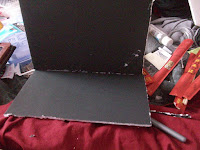
Out of the Black foam board you will need two rectangle pieces
1 piece cut to 10 inches in width by 12 inches in height (Piece A)

1 piece cut to 10 inches in width  by 14 inches in height.(Piece B) This piece determines the height of you glazing rack. If you want to make the shorter rack  the dimensions for this piece would be  10 inches in width by 9 inches in height. I would not go any shorter than 9 inches but you can go as high as you would like as long as it is still stable while it is standing alone.

The dimensions for the side and top supports are as follows, and they are also pictured above.

2 rectangle pieces of foam board cut into  1.5 inches in width and  10 inches in length(Piece C)

2 Triangle pieces  that have a 10 inch bottom  and a 2 inch flat top instead of a point. (Piece D)

Now how to put it all together

IBDCraftylady Glazing RackIBDCraftylady Glazing Rack
 Bottom of the board                         Top of the board

You start off with Piece A Draw a line threw the center of this piece so that you have 6 inches on each side of the line . You will then place stick pins threw the foam board  all along the line

IBDCraftylady Glazing RackIBDCraftylady Glazing Rack

Place Piece B so that the stick pins are going into the foam part on the bottom of Piece B.
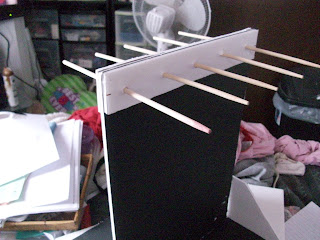
Add glue before pushing it all the way to the bottom . You will also want to check the bottom of Piece A to make sure all of the stick pins are in all of the way. When done it should look like the pictures above  from the front and side views.

IBDCraftylady Glazing Rack

On Piece D  find the center and draw a line.
Use this line to center the upright part of your rack.(or piece B)
Add glue to the areas of your bottom part of your rack (Piece A) and the upright part of your rack. (Piece B) that will be touching Piece D. Put Piece D in position and  attach with stick pins, as pictured above. Repeat these steps on the other side of the glazing rack with your second Piece D. You should now have a rack that looks something like the picture below.

IBDCraftylady Glazing Rack

(Sorry about the mess in these pictures as I had just moved and had nowhere to craft. but I had this idea and had to make it right then and there . Proof this is quick and easy to make  in no space lol)

IBDCraftylady Glazing Rack

For the top Brace Place the 2  Piece C foam boards together and poke holes threw them using the chop stick. placing the first hole 1 inch from the end the 3 inches apart until you have 5 holes.

IBDCraftylady Glazing Rack

Glue 1 of Piece C to the top of your rack once dry start at one end placing your chopsticks threw each hole. Now place your other Piece C onto the chop sticks on the other side , adding  glue to attach  your foam board and to hold all of your chopsticks in place.
Again sorry there were not more detailed picture of each step in the making of this glazing rack, but at the time it was just a whim project that I ended up whipping together because I could not find what was needed, and I never expected to be doing a DIY on paper bead glazing racks at the time.


IBDCraftylady

Wednesday, March 23, 2016

Hanging Tags

IBDCraftyLady Hanging Tags

 Since I am not always able to remember how many times I have dipped or painted a certain string of my beads, I like having a way to keep track of this. What better way of doing this than to create a group of tags with numbers on to do the remembering for me. These hanging tags have helped me out way more than I like to admit. Before I started using these hanging tags in my bead making process. There were many times over a week's time that I have dipped or painted my beads , hung them up to dry. leaving them for days before getting back to them. Finally when I have the time to get back to them I would not remember how many layers were on each bead . Now that is never a problem everything is clearly marked and keeps me right on track.

What you will need to make your own Hanging Tags

Crafting wire

Packing Tape

Marker/Pen

Tissue Paper (or any kind of paper you want to use) I used tissue paper  because it is what I had in a lot of different colors and I also liked the sort of transparent look it added to my tags. So get creative and make them with your own special flare.


IBDCraftyLady Hanging Tags
You will start off by using the crafting wire to form the shape you want your tags to be, ten form a loop on the top of it. For my set of hanging tags I wrapped the crafting wire around a  tube of glass beads to get a circle shape and then  formed a loop at the top of the shape. Since I do not usually go over 5 layers of any type of glaze or paint on my beads. I created 50 of these crafting wire frames.
This way I will have 10 hanging tags for each number .

Cut out pieces of tissue paper that will be able to fill in the shape of your crafting wire frames
Lay out a piece of packing tape sticky side up and place all of your crafting wire frames onto the packing tape. Now place your tissue paper cut outs into these crafting wire frames.

IBDCraftyLady Hanging Tags
With a marker / pen  write the number you want onto each hanging tag.


IBDCraftyLady Hanging Tags
Fold the other half of the packing tape onto the top of your hanging tags.  
Sealing them in between the tape

IBDCraftyLady Hanging Tags

 Cut all of your hanging tags apart and trim them the best you can. There you have it easy as can be and you will never again forget where you were in the process of making your beads.

 I hope that these hanging tags are as helpful to you as they are to me, and that they help you be a more well-organized and productive bead maker in your future projects. Please feel free to share with me how your Hanging tags have turned out. 

I cannot wait to see how others have created these hanging tags to fit their own personalities and crafting styles.
IBDCraftyLady Hanging Tags

Monday, March 21, 2016

Bead Racks

So just what are bead racks and why do I need them ?

Bead racks are use to keep the beads you make safe from being damaged until then can be baked, painted, or glazed.


There are plenty of different types of bead racks to choose from. Different types of beads will need different types of racks,  Plus every bead maker has their own way of making the racks they need. Since The IBDCraftyLady Paper Bead Project  is focusing on Paper beads.  I have made and used a ample amount of different types of racks while making  paper bead. Below I will discuss them all telling you both the good in them and the problems I had while using them.  In 2 days I will then post a DIY  to show you how I make the racks I now use for my paper beads .


 The first racks I used  were just  a piece of cardstock, by just  making an accordion fold out of a piece of card stock. Rolling the paper beads on a toothpick then balancing them between the folds
Good side of making this type of rack it costs nothing
Problems with this method is that it is not very sturdy and the paper beads are easily disturbed. Just walking by them could cause a breeze and they would be everywhere but where I left them. You can also go thru a lot of toothpicks.
After the folded paper racks I moved onto the  use  of Styrofoam  block
Good side of this kind of rack is it was very cheap as I had Styrofoam just laying around in my art room. It is also nice if you are not making a lot of beads
Problem with this type of rack was that it was only good for putting on 1 layer of glaze or paint. When I would go to do another layer I would  have to spend time removing all of the paper beads one at a time glazing them then replacing . It also knock over easily, and made a mess with tiny Styrofoam pieces all over the place.

Where  the Styrofoam  block was to light and I hated the tiny pieces all over the place I decided I need heavier and something that would not make a mess so I moved onto a slab of clay with holes in it. 
Good side of this was it stayed in place, and it was still cheap to make as I had clay laying around.
Problems with this rack was that it was sort of a hit and miss type of thing. Sometimes the toothpicks stayed in and other times they would just go in any direction they felt like going usually taking all the beads  around them with them.

 I had it with these types of racks and took a good look at my favorite racks that I used for my polymer clay beads. These racks I had made from flashing that was purchased from the hardware store. Since I did not want to use metal racks for my paper beads I decided to make them out of cardboard.  So I cut a Cracker Box in Half and cut some  notches on each side 1 inch apart.


 Good side of these racks are that they keep the beads in place. I can reuse the wires used to place the beads . I can paint or glaze more that 1 paper bead at a time. It is easy to do multiple layers of glaze or paint without upsetting the other beads. They are the perfect size for when I am making paper beads for a single project.
Problems with this rack If you want to make a lot of beads you will need a bunch of racks. You can paint or glaze more paper beads at a time but you cannot dip them.

This is the bead rack that  I will be creating The DIY Project for next week.

Monday, March 14, 2016

Glue Bottle Holder

This little holder will keep your glue always ready for use. No more waiting for it to get to the tip of the bottle, and it is always right where you left it.

What you will need to create this Glue Bottle Holder
1 Empty Cereal  Or cracker box
1 Empty Paper Towel roll if you do not want to form the small tube out of your box.
some packing tape
Some paper or Contac paper to cover it when you are done

This is pretty much Free to make. I used all scraps of the materials to make this glue bottle holder. The way I see it crafting tools like these should be as cheaply made as they can be. They serve their purpose and if they get to a point where you cannot use them anymore then you can just toss it and make a new one.

Cut a piece of your cardboard box to the dimensions of 2.5 inches wide by 8 inches long.
Then make a crease every 2 inches so that it looks like the photo above.
Use packing tape to connect the 2 ends in order to form a bottomless box.
I also used the part of the box where it was glued together in order to make it a bit more bottom heavy.


Cut another Piece of the cardboard box to the dimensions of  1inch wide by 4 inches long.
use packing tape to form a ring.


Cut a 1 3/4 inches long piece of the paper towel tube  off.


Use the packing tape to connect your 2 cardboard tubes like the above picture.


Level and center the larger ring with the top of the box and use the packing tape to secure your tubes to the top and bottom of your box.


Turn your box over
Get an 8 inch long piece of packing tape and fold it in half 
so that both sticky sides are stuck together.
Lay this piece across the bottom of your box and attach it with more packing tape.
It should look like the above photo when you are done.


You can now place your glue bottle into the holder 
either on an angle or straight up and down.
No more worries of drips messing up your working area, it helps to  keeps you from having to clean up spills, and when you set it down you will not end up talking to yourself .
I know personally I have said "now where did that go I just used it" a million times while crafting. That alone makes it worth having in my crafting tools.


 You can leave it just plain or you can decorate it to your liking.

I like to coordinate all of my crafting supply containers and tools so I found some Contac paper that I really liked at the dollar store and use it to keep all of my crafting areas looking like they all belong together.


You can also use this holder to
 Hold your markers as you decorate your papers before they are rolled.
To hold small scissors and a bead sizing tool for when you are working on your jewelry designs or the jewelry pieces themself.

For something so simple it is a big help in so many ways, it will only take you about  5 - 10 minutes of your time  to make one so go ahead you might as well make a  few extras. 

Other Links you may find useful


Friday, March 11, 2016

DIY Paper Bead Roller and Bead Hole Maker

 These are my favorite Paper Bead making tools.
These tools are so easy to make and you only need a few items to create them all.

What you will need to make these tools:                                                                    Price
1)  pen will make : 1 Paper Bead Rolled and 1 Bead Hole maker                     a pack of 5 pens $1
1)  3/32 cotter pin (for the roller)                                                                       a pack of 6 for .69 cents
1) 1 1/2  inch Bright Wire  Nail     (for the hole maker)                                    a pack of nails $2.49

A Glue gun                                                                                                          $5
A few Glue sticks                                                                                                $4.97

The prices above reflect what you would have to spend if you did not have any of these items in your crafting supplies.
When I created mine it cost be about  .50 cents as i just had to purchase a few cotter  pins.

Gather your supplies together

The hardware store near me sells the cotter pins separately  for between .10 and .15 cents each so I picked up a bunch of different sizes to test out, the 3/32  worked the best for me. 

Take the old pen apart.
Get rid of the ink section and the white part of the clicker if your pen has one.

 Now just fill some of the empty section of half of the pen with hot glue and place the cotter pin
into the hot glue. Center the cotter pin  the best you can, once the cotter pin is placed add some more hot glue to fill in the hole and  to seal it in good and tight so it does not move..

And there you have it a paper bead roller. For this 1 I used the top of an old pen.  I just love this roller and since these pens had a grip on them it felt very comfortable in my hand as I used it.

 This one was made from the bottom of the same kind of pen with a longer and thinner cotter pin.

When using the bottom of the pen, make sure to glue the loose clicker into the bottom space of the pen to give it a  nice rounded bottom and a more finished look.

 Since this cotter pin was longer and thinner  it makes smaller holes in the paper beads  but it is not as strong as the other  one. In order to use this paper bead roller I needed to add 2 beads in order to stabilize it . Beads are formed in between the 2 beads if you do not use the beads 
it will separate and your paper bead will unwind easily.

 I also used a dremel  to trim the clip off of the bottom of the pen. This way it does not feel uncomfortable in your hand and it will not be in the way while you are making your beads.


Bead Hole Making Tool
This tool helps you to  have nice clean holes in your beads . To make these tools you just place nails into the hot glue instead of the cotter pin.


 One hole Bead tool.


Two hole bead tool


Above are the tools that I  use when I create my 1,2 and 3 hole beads.
 You will have to decide what tools you will need in your supplies and how many you want to make. I do not like making my beads larger than 1 inch, so these are all the tools I need.